Finding your dream home isn’t easy. You’ll spend a lot of time scouring online listings, attending open houses and scoping out neighborhoods – and you may still come up empty-handed.
Maybe your dream home just doesn’t exist yet. In this case, building a home on a vacant piece of land may be the perfect option.
But before you get serious about laying a foundation, be aware that a land purchase may yield more surprises than buying a home – from easements and zoning restrictions to environmental conditions that could easily turn your dream build into a headache the size of a McMansion.
Whether you’re buying vacant land to build a home for your family or you hope to sell the plot for a profit in the future, follow these rules to avoid buyer’s remorse.
Here are the do’s and don’ts of buying vacant land:
Maintaining your home and making necessary upgrades is a critical part of being a homeowner. Failure to update things like your roof, heating and cooling systems, and plumbing can lead to major issues down the road and loss of property value. At the same time, renovations like redoing your bathroom or overhauling your kitchen can make your home more functional and appealing to future buyers.
But what improvements actually retain their value?
Looking at data from the 2023 Cost vs. Value report by Remodeling by JLC, here are the top five home improvements you can make to help increase your property value. The report analyzed the average costs for 23 major home improvement projects in the 150 largest markets in the U.S. and calculated a projected return on investment (ROI).
READ: 6 Boring but Important Home Improvements You Can Make
1. HVAC Cooling and Heating Systems
HVAC systems can be very costly to install or upgrade. Heating and cooling are also major components in a home that directly impacts the monthly utility bill. According to the JLC report, the average job cost is $17,747. While that may create sticker shock, it had an average resale value of $18,366, or a 103% ROI.
“Many buyers are looking at the cosmetic upgrades, but are ultimately leaning towards houses that have the four main systems upgraded including HVAC,” says Charles Fischer, real estate investor, broker and CEO of Fischer Group at eXp Realty on Florida’s Space Coast. “People are paying a lot of attention to energy efficiency when they’re buying. With interest rates so high, folks are looking at every cost, including utility bills, to make sure they are staying within budget.”
2. Garage Door Replacement
If you have a garage door that is outdated or a bit worse for wear, you’ll be happy to hear that replacing your garage door is one of the improvements that provides a 102% return on investment. According to the report, installing a new garage door on galvanized steel tracks with a motorized opener should cost just over $4,300 on average and have a resale value of $4,400.
3. Exterior Stone Veneer or New Vinyl Siding
“First impressions are everything,” says Michael Winn, owner of Winn Design + Build in McLean, Virginia. “When someone pulls up, you want the house to feel well cared for.”
This isn’t just about curb appeal, Winn says: It also means the home was built with high-quality materials and is in appropriate condition for the neighborhood.
Having manufactured stone veneer on at least half of the home, or replacing new vinyl siding, has a 102% and 94.7% ROI respectively. Stone veneer is popular in certain areas of the country, largely in housing developments in the suburbs of major cities across the South. Vinyl siding is more commonly found in older homes and homes throughout the Northeast.
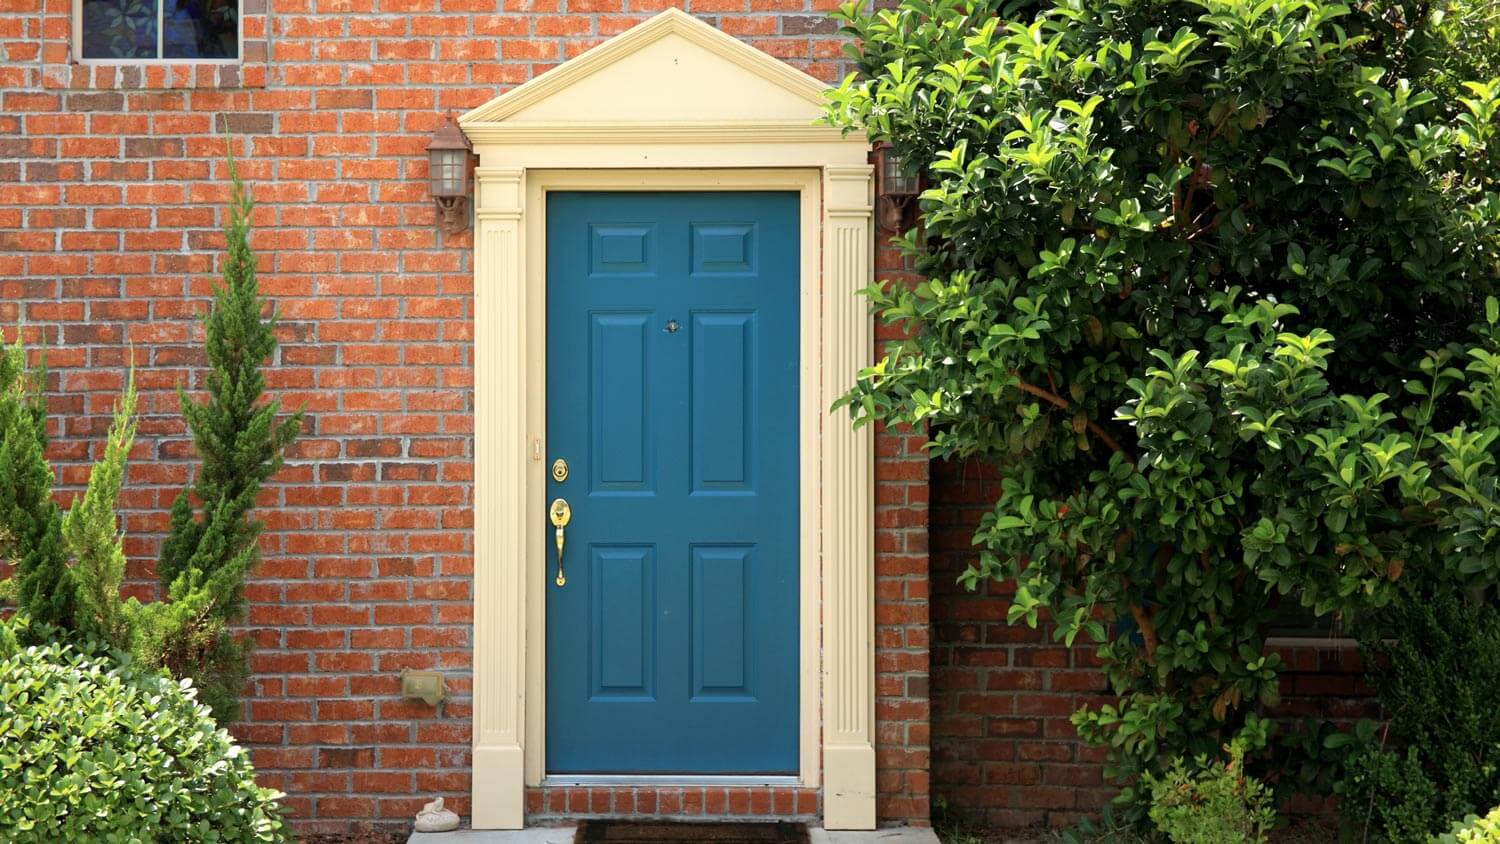
4. New Entry Door
Regarding first impressions, replacing an older front door with a new 20-gauge steel door, particularly one that has glass and the same color on both sides, should deliver a 100% ROI. Front doors are a surprisingly expensive investment, costing around $2,000 to $3,000 or more to purchase and install, depending on the door and whether you are DIYing it or not.
“I tend to recommend spending more on a front door – one that feels sturdy,” says Winn. “Even if it’s not something that’s observed consciously by the buyer, I think on a subconscious level, the quality of the door has an impact on their decision.”
5. Minor Kitchen Remodel (Midrange)
The last home improvement that can confidently increase your property value is a minor to midrange kitchen remodel. “Kitchens can really date a house. If it has been updated and feels well designed and well constructed, I think it makes the whole house feel of a better caliber,” says Winn.
Modernize an outdated kitchen with things like painting or replacing kitchen cabinet fronts, changing out hardware, replacing appliances with energy-efficient units and adding more resilient modern flooring. Minor or midrange kitchen remodels cost around $26,000, according to the report, and have a resale value of just under $23,000.
This isn’t redoing the entire kitchen from top to bottom with the state-of-the-art units, finishings or counters. That type of high-end or large-scale remodel costs around $78,000 on average and provides around a 41% ROI, which is a huge difference compared with a midrange return.
It’s important that you don’t over-renovate for your neighborhood. Choose modern touches that are on trend but have staying power – functional and energy-efficient without breaking the bank.
Home Improvements That Don’t Recoup Their Full Cost
Here are other popular home improvements that don’t quite make the cut. This doesn’t mean these renovations aren’t worth it, but it is helpful to know you may not get your full investment cost back at sale time.
Windows, vinyl: 68.5% ROI. For wood windows: 61.2%.
Midrange bathroom remodel: 66.7% ROI.
Shingled roof: 61.1% ROI.
Deck: 50.2% ROI.
Metal roof: 48.9% ROI.
Remember that every market and home is unique. For example, energy-related projects like replacing windows, adding insulation or replacing HVAC hold more value in older homes compared to newer properties. “In Florida, insurance is going sky-high,” Fischer says. “So having roof, plumbing, electrical and HVAC up to the newest code is a big deal right now. The roof is very important too, so the buyer can have a good wind-mitigation report and get reasonable homeowners insurance.” This is a good starting point to help you focus on the improvements that are likely to help increase your property’s value. Where you live, the age of your home and the general condition of homes in your neighborhood will ultimately tell you where your money is best spent.
Building a house is a big and exciting step. It’s a chance to bring your vision of a dream home to life. But it’s not as easy as it may seem.
Many people run into problems along the way when they try to build a house. These problems can cause delays, cost more money, or even leave you with a house that doesn’t meet your needs.
With careful planning and smart decisions, you can avoid these issues and enjoy a smoother process. Let’s explore some common mistakes and how to prevent them.
1. Not Having a Solid Plan
Planning is the most important part of building a house. Many people jump into construction without a clear idea of what they want or need. They may hire builders or start buying materials before having a solid plan.
This can lead to changes later, which are often expensive and time-consuming. A good plan covers everything. Consider your budget, timeline, and home design.
Be specific about what you want in each room. Consider your family’s needs now and in the future. Include all home-building essentials in your plan to avoid unnecessary setbacks.
2. Choosing the Wrong Location
Where you build your home matters a lot, the land you choose affects how your house will be built. Things like soil type, drainage, and the slope of the land can make construction easier or harder.
Think about the neighborhood. Is it close to schools, stores, or your workplace? Will it be a good place to live for years to come?
Take time to research the area before buying land. A good location can save you money and make your home more enjoyable.
3. Failing to Budget Wisely
Building a house costs money. It’s not just about materials and labor. You also need to pay for permits, inspections, and other fees.
Unexpected expenses can also arise, like fixing problems with the land or changing plans during construction. To avoid running out of money, create a detailed budget. Include everything you can think of and add extra funds for surprises.
4. Hiring Inexperienced Builders
The team you hire to build your house is one of the most important decisions you’ll make. Some people try to save money by hiring less experienced builders. While this might seem like a good idea at first, it can lead to problems later.
Mistakes during construction can be expensive to fix. Look for builders with a good reputation and plenty of experience. Check their references and ask to see examples of their work.
A skilled team will make sure your home is built correctly and on time. Whether it’s the structure or details like wood floor refinishing, it’s worth paying a little more for quality work.
5. Setting an Unrealistic Timeline
Building a house takes time. Many people underestimate how long it will take to complete their project. This can lead to stress and rushed decisions.
A rushed job is more likely to have mistakes or poor craftsmanship. Create a timeline that includes every step of the process. This should cover planning, permits, construction, and inspections.
Be prepared for delays, as they are common in construction. If you have a clear schedule, it’s easier to stay on track and avoid feeling overwhelmed.
6. Focusing Only on Looks Over Function
Everyone wants their home to look great. But focusing too much on appearance can lead to problems. For example, a design that looks nice but doesn’t work well for daily life can make living in the house frustrating.
It’s important to think about how you will use the space. Choose designs that are both beautiful and practical.
For example, make sure there’s enough storage space, good lighting, and easy movement between rooms. A functional home is more comfortable and enjoyable to live in.
7. Overlooking Energy Efficiency
Energy efficiency is more important than ever. A house that uses energy wisely saves money on utility bills and is better for the environment. Decisions you make during construction can have a big impact on how efficient your home will be.
Good insulation will keep your home warm in the winter and cool in the summer. You should also choose energy-efficient windows and appliances.
Solar panels and smart thermostats are other options to consider. Although these features may cost more upfront, they save money in the long run.
8. Failing to Communicate With Your Team
Good communication is key to a successful project. If you don’t stay in touch with your builders, mistakes can happen. Misunderstandings about your plans can lead to delays or changes that cost money.
Talk to your team regularly. Make sure everyone understands your goals and expectations. Ask questions and share your thoughts.
Being involved in the process helps keep everything on track and ensures your home turns out the way you want.
9. Skipping Important Details and Inspections
Many mistakes in home building happen because people don’t pay attention to details. For example, skipping site inspections or failing to review plans carefully can lead to big problems later. Taking time to check everything along the way helps you catch issues before they become serious.
It is very important to work closely with your builders to ensure every step is done right. Attention to detail matters, from laying the foundation to installing the roof. This careful approach helps you avoid costly errors and keeps your project moving smoothly.
The Key Takeaways: How to Successfully Build a House
When the construction is finished, you’ll have more than just a house-you’ll have a home. It will be a place where you can relax, make memories, and build your future. Taking the time to plan carefully and avoid mistakes ensures your home will meet your needs and bring you joy for years to come.
By avoiding common mistakes and working with skilled professionals, you can create the home of your dreams through successful home construction. Start planning today and take the first step toward a brighter future when you build a house.
Creating a safe and viable construction site begins with site preparation.
Just because you own a block of land doesn’t mean it’s ready for construction.
Site preparation has a number of essential phases, including site evaluation, demolition, site set out, and site clearing.
In this blog post, we’ll discuss how you can lay a strong foundation for your future construction.
Let’s get started!
1. What is site preparation in construction?
Before you can begin any construction activities, you must prepare your site.
In short, it is all of those activities that occur on your land before you can begin construction on your building.
While this is pre-building work, it can include construction work, such as the demolition of existing structures; grading, leveling and clearing the land; moving earth; and drainage projects.
Done right, site preparation lets you identify site complications upfront and confront them prior to initiating your larger building project.
2. What are the steps in site preparation?
Site preparation (when done correctly) makes all other construction activities easy and straightforward.
For example, if you intend to build a home on the land, then you’ll need to prepare the site by selecting a location conducive to construction, know where to dig (and where not to dig), and implement project management to reduce potential mistakes and delays.
To keep it clear and simple, we’ll talk you through the necessary steps in any site preparation project.
Site evaluation
Before you begin anything, you first want to analyze the site to make sure it is suitable for your project.
Is it the right size and shape?
How steep is the slope?
What uses are allowed under local zoning regulations?
You will want to make sure the property will work for your project before putting any money into site prep.
Soil testing
A geotechnical site investigation is an essential part of site preparation.
This is performed to determine the composition, properties and characteristics of the rock, soil and groundwater beneath the site.
It allows you to evaluate the site conditions and collect data to construct and design the foundations of various structures.
This examination will include surface and subsurface exploration, soil and groundwater sampling, and laboratory analysis.
Ultimately, subsurface medium will be tested to determine how well it absorbs water as well as its strength and soil bearing capacity.
If the site’s soil isn’t suitable for the project, then you’ll need to find a different location.
In the following section, we’ll go over the different types of soil in more detail.
Site plan design
Following your site evaluation and geotechnical testing, you should plan the design of your construction site.
This includes the placement of septic tanks, drainage systems, structures, etc.
A site plan will also show any necessary access roads for temporary storage areas and construction vehicles.
This plan may then need to be reviewed by the county or city building department for compliance with the zoning and building code.
If the plan is approved, all necessary permits, such as a demolition or earthwork permit, will be issued.
Site surveying
At this stage, you will outline where all structures, fixtures and utilities are to be placed on the site.
Site marking is essential because you may find that you are not building in the correct area if survey pegs do not delineate the construction site.
In addition, if the property is in a heavily developed area, an underground utility map may be created at this point to ensure that no important pipes or cables are damaged during construction.
Site clearing and grading
At this point, work can begin on the land.
The next stage of site preparation involves grading and clearing the land so you can move forward with the construction of your building.
This stage may also involve the demolition of buildings, tree removal, elimination of underground infrastructures, earthwork and filling to level out the building site.
Site compaction
The final stage is to compact the soil so that it can take the weight of the building foundation.
The key is to fully ready the site so that excavation and foundation work can begin.
3. What are the different types of soil?
Soil testing is essential to determine whether it can hold the weight of the building and absorb water.
Testing helps to indicate the type of soil and if it is appropriate for your project.
Class
Designation
Description
Class A
Acceptable
Mostly sand and rock with little or no ground movement from moisture changes
Class S
Satisfactory
Slightly reactive clay sites with only slight ground movement from moisture changes
Class M
Moderate
Moderately reactive clay or silt sites, which can experience moderate ground movement from moisture changes
Class H1 & H2
Highly Reactive
Highly reactive clay sites, which can experience high ground movements from moisture changes
Class E
Extreme
Extremely reactive sites, which can experience extreme ground movements from moisture changes
Class P
Problem
Sites which include soft soils, such as soft clay, silt, or lose sands; landslip; mind subsidence; collapsing soil; soil subject to erosion; reactive sites subject to abnormal moisture conditions or sites which cannot be classified otherwise
Note: If demolition is planned, then you’ll need two soil tests. One will be prior to demolition and another will be after demolition.
4. How long does site preparation take?
For most residential building projects, site preparation takes between 1 to 2 months.
Site preparation for multi-commercial projects can take a little bit longer, depending on the project size.
5. What are the stages of building construction?
Site preparation
Site clearing
Site surveying
Soil testing
Designing of site plan
Site investigating
Foundation
Roofing
Framing
Electrical
Grading
Landscaping
Interior construction
Drywall and insulation
Trim
Cabinet
Floors
Painting
Permanent utility hookups
Punch list and final inspections
6. What are some tips you need to ensure proper site preparation?
Determine the building location and elevation
In siting your structure on the property, you’ll want to consider both the flow of people and equipment (especially if you have multiple buildings) before construction and occupancy.
You’ll want the location of your building to be aesthetically pleasing and to be at the right elevation for drainage purposes.
You will also need to comply with all required setbacks and zoning requirements, which will often limit the area upon which you can build.
Your architect or engineer can help you determine where your building should be placed based on the property characteristics, zoning requirements and structural needs.
Investigate site access
When determining building location, you’ll need to keep site access in mind.
Will you be able to access your building?
Will your builder be able to deliver materials?
Will your site be free of debris, so equipment won’t get stuck?
Will there be enough room for heavy equipment?
Keeping site access in mind is an important part of site preparation because it allows it to proceed both easily and efficiently.
Here are some factors you should consider for site access:
Road, driveway, and culvert width
Location of mailbox
Location of power lines
Location of public sewer lines
Location of existing buildings, bins, etc.
Location of trees
Turning radius of semis
Explore perimeter access
Site access allows people to get onto your land easily.
Perimeter access helps people and equipment move around the construction site once they are already on the land.
Your construction crew will need to move around.
To do this, you’ll want to maintain a clear and dry perimeter that allows materials, equipment, and crews to move swiftly.
For example, stockpiling fill or gravel near the building pad may restrict equipment flow or retain water.
A row of trees along one side may obstruct a gradall from fitting through.
Having extra dirt or sand in the way will prohibit the crew from using the equipment that they need.
Whatever the case, you need to make sure that you remove all obstacles from the perimeter to ensure a smooth and quick construction process.
Protect your investment
Site preparation is all about reducing your risk and protecting your investment.
A lot of this has to do with selecting the right builder.
Here are some key points to consider as you go select your contractor.
Safety: Your builder should have a safety program and a full-time safety manager.
Project manager: A designated project manager will oversee the construction of your building and provide you peace of mind.
Builder’s risk: Your builder should have a risk insurance policy that protects you from theft, storm damage, or vandalism during construction.
Warranty: Make sure that your builder provides a comprehensive warranty plan.
Prepare your building pad
Your building pad must be prepared correctly during site preparation.
Here are some key features:
1. Timing
Determine the best time to build your pad.
Some seasons are better than others depending on your climate!
2. Structure:
Before constructing your pad, highlight the best areas of your site to ensure that your pad is on solid ground.
3. Fill type:
Evaluate the different fill types and decide which has the greatest advantage.
4. Drainage:
To minimize water infiltration within your building, it’s important to install proper drainage.
If this is done incorrectly, then it’s likely to have long-term effects on your building.
Set your crew up for success
Simply put, proper site preparation allows your team to build more efficiently.
Here are three ways that this process allows your crew to get off on the right foot.
1. Avoid muddy sites
Muddy sites create a ton of challenges for you and your crew.
Their boots will collect mud, and it’ll become heavier and harder to walk.
Your trucks may get stuck, or you’ll track mud onto all your materials or concrete floors.
You may also find that your gloves become covered in mud, and it becomes difficult to hold materials and work equipment.
Needless to say, avoid muddy sites at all costs!
It will impact your building quality and majorly slow down your efficiency.
If you must work on a muddy site, do what you can to weather-proof it and bring in gravel.
2. Stock your site with equipment
Not having access to the right equipment around your building’s perimeter can cause lower efficiency or require more people to get a single job done.
Stay on track by having the right equipment at your site.
3. Locate any obstacles underground
One of the fastest ways to derail a project is by hitting an object underground while digging.
This is an obstacle that’ll cost you both time and money.
It can also be a safety concern if you hit a gas or power line.
Make sure you take the proper safety precautions and perform an underground utility search to ensure you and your crew have an accurate map of what lies below your site.
Call 411 to get your utilities flagged before you work!
7. What’s the value of investing in site preparation?
When constructed properly, buildings can last for decades.
That’s why it’s so important to invest in proper site preparation.
You don’t want to set yourself up for years of pain by not giving your foundation a solid platform to rest on.
Here are just some of the factors that have the ability to weaken your foundation:
Varying moisture content or poor drainage
Improper site compaction
The soil type (building on fill or expansive soils)
Unstable soil and soil displacement
Investing in site preparation allows you to prioritize what’s most important — a solid foundation!
Without that, you can’t hope to have your construction project succeed.
8. How much does site preparation cost?
Site preparation varies based on the building type.
Here’s the approximate cost.
Note that the costs can vary wildly based on location, elevation, type of granular fill, building pad size, and amount of object removal.
¼ Acre
$50 – $500
½ Acre
$100 – $1,000
1 Acre
$200 – $2,000
2 Acres
$400 – $4,000
3 Acres
$600 – $6,000
4 Acres
$800 – $8,000
If the costs seem significant now, remember that site preparation extends your building’s lifetime and helps to reduce your total project construction costs.
One way to save on costs is to do some of the work yourself if you are qualified to do so.
9. How can site preparation ensure that you finish your project on time?
Obviously, you want to finish your construction project on time.
Proper site preparation is one of the best ways that you can set your crew up for success and ensure that your project is completed at the project end date.
Here are some scheduling factors that will need to be taken into account.
Seek out a builder that is aligned with your project schedule and work with an excavator who understands your deadlines.
Having the right team is crucial to meeting your deadlines!
Locate any underground obstructions or hazards.
Above, we talked about creating an underground site map.
During this process, you may locate obstructions or hazards as well.
What needs to be relocated or removed before site preparation in order to minimize work?
Check to see if you need a permit for site preparation.
This will ultimately depend on your locality.
Sometimes you don’t need a permit for site preparation, which will ultimately save you time.
However, if a permit is required, be sure that you go through the proper process.
Don’t try to cut corners, this will ultimately create major problems for you later on!
Recognize that the schedule and duration of site preparation will be impacted by a variety of factors, including size and type of equipment, competencies and specialties, crew power, backlog, etc.
Try to prepare a weatherproof site with gravel drives, gravel perimeter access, gravel staging in areas, and a gravel building pad.
Doing this prior to the start of construction can help minimize project delays due to a muddy site.
Final thoughts
Site preparation may feel overwhelming now, but don’t fret!
This process is all about preparing your land for success, and you aren’t in the process alone.
Working with a builder who can facilitate the ideal site layout and building location can allow you to optimize your site for construction.
A home renovation is an exciting opportunity to improve the look, functionality, and value of your space, but choosing the right contractor is crucial to the success of your project. A skilled and reliable contractor can turn your vision into reality, while the wrong choice could lead to delays, subpar work, and added stress. Whether you’re planning a major renovation or a small remodel, finding the right professional to handle the job is essential.
In this guide, we’ll walk you through the key steps and considerations for choosing the right contractor for your home renovation project. From checking credentials to understanding contracts, these tips will help ensure you hire a contractor who delivers quality results on time and within budget.
1. Define Your Renovation Goals and Budget
Before you begin your search for a contractor, it’s important to have a clear idea of what you want to achieve with your renovation and how much you’re willing to spend. Defining your goals and budget upfront will help you communicate your vision more effectively to potential contractors and avoid misunderstandings later on.
Steps to Define Your Renovation Goals:
Identify Key Areas for Renovation: Make a list of the rooms or areas you want to renovate and any specific changes you want to make. Be as detailed as possible so that you can explain your vision clearly to contractors.
Determine Your Priorities: Decide which elements of the renovation are most important to you. For example, is it essential to have high-end materials, or is staying within budget your top priority? Knowing your priorities will help you make decisions throughout the process.
Set a Realistic Budget: Renovations can range from modest to high-end, so it’s important to set a budget that reflects your goals and financial situation. Factor in unexpected costs by setting aside 10-20% of your budget for contingencies.
Having a clear understanding of your renovation goals and budget will give you a solid foundation when discussing your project with contractors.
2. Research and Create a Shortlist of Contractors
Once you’ve defined your project’s scope and budget, it’s time to start researching contractors. A good place to begin is by asking friends, family, or neighbors for recommendations. Word of mouth is often one of the most reliable ways to find a trustworthy contractor. Additionally, you can use online directories, review sites, and local industry associations to compile a list of potential candidates.
Tips for Researching Contractors:
Check Online Reviews: Read reviews on platforms like Google, Yelp, or Angie’s List to see what past clients have said about their experience with the contractor. Look for contractors with consistently high ratings and positive feedback about the quality of their work, communication, and timeliness.
Visit the Contractor’s Website: A professional website can give you insight into a contractor’s experience, services, and portfolio. Look for before-and-after photos of completed projects similar to your own renovation plans.
Verify Membership in Industry Associations: Contractors who are members of professional organizations, such as the National Association of the Remodeling Industry (NARI) or the Better Business Bureau (BBB), tend to adhere to higher standards and best practices.
Look for Licenses and Certifications: Make sure the contractor is licensed, bonded, and insured. Licensing requirements vary by state, so check with your local licensing board to ensure the contractor is in good standing.
By thoroughly researching potential contractors, you can narrow your list to a few qualified professionals who are well-suited to your project.
3. Conduct Initial Interviews
Once you’ve created a shortlist of potential contractors, it’s time to conduct interviews. This step is critical to assessing the contractor’s professionalism, experience, and ability to handle your renovation. Be prepared to ask detailed questions about their process, past projects, and availability.
Key Questions to Ask During Interviews:
How long have you been in business? A contractor with several years of experience is more likely to have the expertise needed to manage your project effectively. Look for contractors with a proven track record of success.
Can you provide references from past clients? Ask for references and contact previous clients to ask about their experience working with the contractor. Were they satisfied with the quality of work, communication, and overall results?
What is your approach to project timelines and budgeting? Discuss the contractor’s process for managing timelines and staying within budget. Ask how they handle unexpected delays or cost overruns.
Do you work with subcontractors? If the contractor uses subcontractors for specific tasks (e.g., electrical or plumbing work), ask about their qualifications and experience. Make sure the contractor oversees the work to ensure it meets your standards.
Are you licensed and insured? Confirm that the contractor holds the necessary licenses and insurance to protect both you and their workers in case of accidents or damages during the project.
Conducting interviews helps you get a sense of the contractor’s communication style, professionalism, and whether they’re the right fit for your project.
4. Get Detailed Written Estimates
After interviewing contractors, ask for detailed written estimates from the candidates you’re seriously considering. A comprehensive estimate should break down the cost of materials, labor, permits, and any additional expenses. This transparency allows you to compare bids and ensure that there are no hidden costs.
What to Look for in an Estimate:
Scope of Work: The estimate should outline all the tasks the contractor will perform, including demolition, installation, painting, and clean-up. Make sure it includes every aspect of the project to avoid confusion later.
Materials and Labor Costs: A detailed estimate should include the cost of materials (e.g., flooring, countertops, lighting) as well as labor. If the contractor offers different material options at varying price points, these should be clearly stated.
Timeline: The estimate should include a projected start date and completion date. While unforeseen delays may occur, the contractor should provide a realistic timeline for the project.
Payment Schedule: The estimate should outline the payment schedule, typically divided into installments (e.g., a deposit upfront, progress payments during the project, and the final payment upon completion). Avoid contractors who request full payment upfront.
By obtaining detailed estimates from multiple contractors, you can make an informed decision based on both cost and value.
5. Check References and Past Work
Before making your final decision, take the time to check references and review the contractor’s past work. A reputable contractor should be willing to provide a list of past clients who can speak to the quality of their work, professionalism, and reliability.
How to Check References:
Contact Past Clients: Reach out to previous clients and ask about their experience with the contractor. Did the project stay on schedule and within budget? Was the contractor easy to communicate with? Were there any issues or concerns during the renovation process, and how were they resolved?
Visit Completed Projects: If possible, visit completed projects in person to assess the quality of the work. This is especially important for large-scale renovations where craftsmanship and attention to detail are critical.
Review Online Portfolios: Many contractors have online portfolios showcasing their work. Reviewing these portfolios can give you an idea of the contractor’s style, skill level, and ability to handle projects similar to yours.
Checking references and past work ensures that you’re hiring a contractor with a solid reputation for delivering high-quality results.
6. Understand the Contract Terms
Once you’ve chosen a contractor, it’s important to review and understand the terms of the contract before signing. A well-drafted contract protects both you and the contractor by outlining expectations, responsibilities, and the scope of the project.
Key Elements of a Contract:
Detailed Scope of Work: The contract should clearly define the work that will be performed, including materials, labor, and any subcontractors involved. This prevents misunderstandings or disputes about what is included in the project.
Project Timeline: The contract should specify the start date, estimated completion date, and any milestones along the way. It’s also a good idea to include a clause addressing potential delays (e.g., weather or supply chain issues) and how they will be handled.
Payment Schedule: The payment schedule should be clearly outlined, including the deposit amount, progress payments, and final payment. Avoid contractors who demand full payment upfront or who ask for payments outside of the agreed schedule.
Warranties and Guarantees: The contract should specify any warranties or guarantees on the work performed. This may include warranties on materials (e.g., flooring or countertops) as well as a guarantee on the workmanship.
Change Orders: In the event that changes are needed during the project, the contract should outline the process for approving change orders and how they will affect the cost and timeline.
Make sure to read the contract thoroughly and ask questions about anything that isn’t clear. Don’t sign until you’re fully comfortable with the terms.
7. Communicate Regularly Throughout the Project
Effective communication is key to a successful renovation. Once the project is underway, maintain open and regular communication with your contractor to ensure that everything is proceeding smoothly and according to plan.
Tips for Effective Communication:
Schedule Regular Check-Ins: Set up regular meetings or phone calls with your contractor to discuss progress, address any concerns, and ask questions. This keeps you informed and helps prevent misunderstandings.
Be Clear About Your Expectations: Clearly communicate your expectations from the beginning, including the level of quality, timeline, and budget constraints. If something isn’t going as planned, address it immediately to avoid larger issues down the road.
Document Changes: If any changes or additions are made to the project, make sure they are documented in writing and agreed upon by both parties. This helps prevent disagreements about costs or scope later on.
Regular communication helps ensure that your renovation stays on track and that any issues are addressed promptly.
As a homeowner, your choice of siding affects not just the appearance of your home but also its ability to withstand weather, insects, fire, and moisture.
It’s hard to think of two types of siding more different than brick and vinyl. As a result, it’s easy to contrast the two, which may help you make your decision. Then, contact a siding professional near you for a consultation and a quote.
Brick vs Vinyl: Key Differences
Brick siding is prized for its strength, fire resistance, and timeless aesthetic, making it a durable siding option that withstands the test of time in both resilience and style. It’s also an eco-friendly material in both its production process and recyclability. However, brick comes with higher upfront costs for materials and installation, and its heavy weight often calls for reinforced structural support.
On the other hand, vinyl siding is a budget-friendly and versatile option. It’s lightweight, easy to install, and available in a wide range of colors and designs. Still, while vinyl requires little maintenance, it has a much shorter lifespan, and it’s vulnerable to fading and warping if it’s constantly exposed to harsh sunlight, chronic moisture, or inclement weather conditions. It’s also not considered eco-friendly, as it’s derived from plastic and non-recyclable materials.
What Is Brick?
Brick is a durable, classic siding option, made by laying bricks in mortar to form a sturdy and weather-resistant barrier. Brick siding is known for its longevity, with some installations lasting over a century with minimal upkeep. It also offers superior resistance to fire, pests, and extreme weather, making it a popular choice for homeowners seeking a combination of durability and timeless aesthetics. Keep in mind that brick veneer siding is different from brick siding. Brick siding is a popular choice for homeowners, and for good reason, but it also comes with some drawbacks.
Pros of Brick Siding
Cons of Brick Siding
Highly durable and long-lasting
Higher cost
Eco-friendly and recyclable
Heavier weight
Fire-resistant and non-combustible
Vulnerable to moisture
Low-maintenance
Limited design and color options
Pros
Some of the chief pros of brick siding are its appearance, long life, and minimal maintenance requirements.
Timeless Look: Brick’s classic good looks will never go out of style.
Long Lasting: Brick can last for generations, as is evidenced by the many brick homes that are hundreds of years old and still standing.
Low Maintenance: One of the most attractive aspects of brick siding is that it’s low maintenance. You don’t have to do much to keep brick in top shape other than cleaning it every so often.
Environmentally Friendly: Brick is an environmentally friendly option not just because of the manufacturing process but also because you can easily recycle the material once removed from the home.
Fire-Resistant: Fire is a constant worry for any homeowner, so it’s comforting to know that brick siding can help protect your home from a fire.
Cons
Higher Cost: Brick is at the high end of siding materials in terms of the cost of installation.
Heavier Weight: Brick siding may require additional structural support due to its heavier weight.
Vulnerable to Moisture: Another downside of brick is that it is more vulnerable to moisture than other types of siding. This moisture can creep into your home and result in mold and rot.
Limited Color Options: Once you go brick, you are stuck with that color for the most part. Many other types of siding can be painted easily, but brick has a limited color pallet.
What Is Vinyl Siding?
Vinyl siding is a lightweight, versatile exterior option made from polyvinyl chloride (PVC) panels. Known for its affordability and wide range of styles, vinyl siding can mimic the appearance of wood, stone, or other materials while requiring far less maintenance.
Vinyl has come a long way in quality, price point, and options. Here are the benefits of this popular siding material.
Pros of Vinyl Siding
Cons of Vinyl Siding
Durable
Difficult to repair
Budget-friendly
Vulnerable to leaks
Wide range of styles and colors
Not eco-friendly
Low-maintenance
Warps or fades easily
Pros
Strong: Whether it’s harsh weather, insects, or fallen branches, vinyl siding can handle just about anything Mother Nature throws at it. It will not warp or rot, and it even handles blunt force impacts well, too.
Inexpensive: Plastic is inexpensive in general, and that is true for vinyl siding. You will save a lot of money choosing this material over other types of siding.
Customizable: Vinyl siding comes in a wide variety of colors, textures, and styles and can even imitate the appearance of materials like wood.
Easy to Maintain: Vinyl doesn’t need to be painted and can be cleaned off with a garden hose.
Cons
Difficult to Repair: A significant drawback of vinyl siding is there’s no easy way to patch up damage. If there are any cracks or holes, you’ll likely need to replace the entire panel.
Vulnerable to Leaks: This is generally only a problem if the siding is installed improperly, but it happens often enough that it’s worth including on our list. If vinyl siding has gaps that allow moisture underneath, it can threaten your home with rot and mold.
Not Environmentally Friendly: Vinyl manufacturing emits a lot of chemicals, so it’s not a great choice for eco-minded homeowners.
Warps or Fades: Over time, exposure to sunlight can cause the color of vinyl siding to fade, especially with darker shades. It can also warp from prolonged exposure to moisture and inclement weather conditions.
It’s natural to focus on looks when deciding on a new kitchen countertop, but there are other factors to consider too. Carrie Schulz, head of design at Block Renovation, a service that streamlines the planning, designing and building process for homeowners, recommends concentrating on aesthetics, functionality and cost when zeroing in on the perfect countertop material for you. “You want to make sure the countertop will fit into your budget before you fall in love with it,” she says. “How the material wears and how hard you’ll have to work to keep it looking new are also key to the decision process.”
Here are more expert insights into those three key factors:
✔️ Aesthetics: Our experts say it’s best to ignore trends and choose the pattern and color that you love the most. But if you think you might be selling your home soon, it pays to stay close to current design trends. Light, neutral hues with minimal pattern play continue to curry favor, which has helped drive interest to quartz. “A lot of homeowners still want to keep it simple and clean,” Schulz says. For those looking to make more of a statement with their countertops, materials with dramatic veining, including marble and other natural stones, are a popular choice.
If you go the dramatic route, it’s important to work closely with your installer on the placement and positioning of adjoining slabs so that veining lines up. “If you end up with a pattern mismatch, it will drive you crazy every day,” Schulz says.
Don’t forget about the backsplash, since it’s another strong visual element in the kitchen. Whereas subway tile and other contrasting surfaces still have their place, many homeowners are now choosing to use the same material from the countertop up the backsplash, creating a sense of continuity and cohesion.
✔️ Care and maintenance: Think about the porosity of the countertop and the finish. A nonporous material with a polished finish is unlikely to absorb anything, making it stain-resistant. Honed finishes, in which the surface has been ground down to give the countertop a softer, matte feel, require a bit more care, but you might be willing to put up with that for the softer feel and reduction in glare. A porous material like marble with a honed finish will require near-obsessive upkeep (regular sealings throughout the year, lightning-fast clean-up of spills, treatment of etch marks with a special poultice, etc.) to keep the surface looking new. Bottom line: Do you want to fuss over your countertops or keep maintenance mainly to a daily wipe-down?
✔️ Cost: Most homeowners spend about $3,000 on the installation of new countertops, according to Angi, the home services marketplace. But the price tag can go as high as $8,000 (and even higher for imported materials, like calacatta marble from Italy or a Van Gogh granite from Brazil) and as low as $400 for entry-level laminate. Of course, the actual cost depends on the size of the countertop, so it’s good to look at square-footage prices. You should expect to spend around $40 per square foot for affordable materials, like entry-level laminate and butcher block, and $150 or more per square foot for a rare natural stone or top-quality quartz. That doesn’t include edge treatments, which add another $5 per linear foot for a standard square edge, all the way up to $60 per linear foot for an S-shaped ogee, which adds decorative flair and also reduces the risk of chipping
Hardwood floors have been bringing natural beauty to interior spaces for centuries. Available in nearly endless textures, colors, and finishes, this flooring option offers an organic ambience absent in many of today’s manufactured materials. Purists swear by its warmth and refinement, and its mere presence can have a positive effect on a home’s resale price.
Laminate flooring has come a long way since its debut.
Photo: istockphoto.com
There are many more types of laminate flooring available today than your parents were able to choose from. Laminate floors are engineered to approximate the look of natural materials—wood as well as stone. The essential technology dates back to the 1920s, with the development of compressed wood and lamination industries, although early household laminates were used primarily as countertops.
Laminate flooring was introduced in the 1970s and took off thanks to its durability and affordable price point. Versatile and long lasting, laminate remains a popular flooring option that continues to improve in quality, appearance, and variety.
Laminate flooring is more scratch-resistant than most hardwood flooring.
Wood-look laminate boasts UV protection and resists scratches and dents, so it is perfect for placement in high-traffic and sun-drenched areas. Today’s laminates can hold their own in hardwood vs. laminate comparisons of durability and style. In fact, their appearance has come so far in recent years that it can be hard to distinguish some laminates from their natural inspiration.
Hardwood flooring ages more quickly than laminate flooring.
Beloved by interior designers, historians, nature lovers, and anyone who appreciates fine craftsmanship, hardwood flooring imbues a space with an enduring quality, thanks to its long history in home building. Homeowners who swear by hardwood’s character refuse to settle for anything less, particularly when they’re remodeling an older home. But the same organic attributes that lend warmth and character to hardwood can be a turnoff for some—specifically, the way that long-term wear and tear ages wood.
Unlike laminate, hardwood reacts to intense sunlight and is sensitive to high-heeled shoes, pets, kids, and furniture, all of which can dent and scrape wood. Over time, this translates into a rustic appearance that some admire but others view as shabby or tired.
Laminate flooring costs half the price of hardwood flooring.
Cost is easily the biggest selling point of laminate flooring; it typically runs about half the price of hardwood. Before you spring for the best-priced laminate you can find, however, bear in mind that lower-quality (which usually means cheaper) laminate often looks less realistic. So, as you’re weighing your options, remember the old adage: You get what you pay for.
Installation costs for laminate flooring are also lower than those of installing hardwood floors.
Photo: istockphoto.com
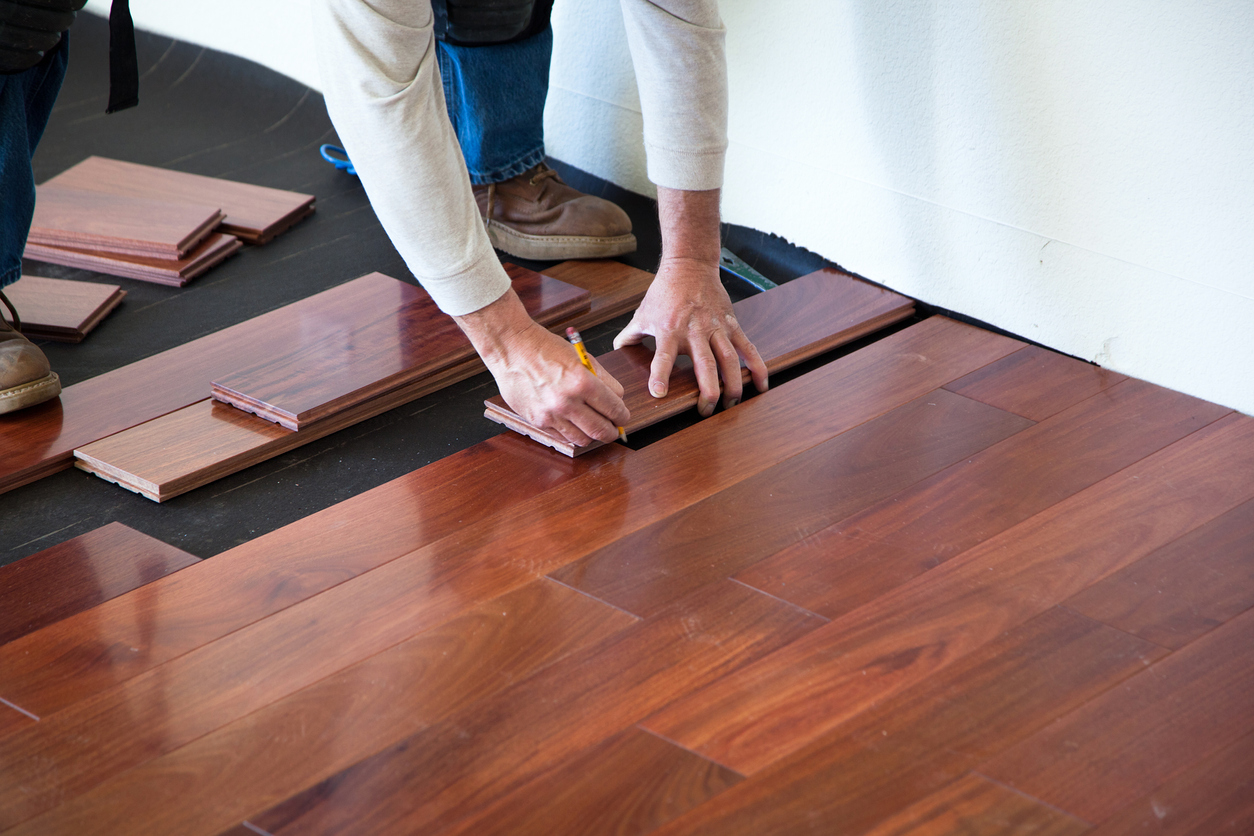
Laminates do offer a bonus for handy homeowners: While some hardwood floors are being tailored for the DIY market, laminate, which is considered simpler to install, has long been viewed as the go-to DIY option. Once the underlayment and/or vapor barrier have been installed, laminate can be popped into place with (depending on the product) tongue-and-groove or snap-and-lock edges, making it a fairly straightforward weekend project.
Hardwood flooring is available in a wide range of sustainable options.
Hardwood also holds appeal for remodelers who are interested in environmental sustainability. It’s been more and more popular in recent years to use reclaimed wood when building or remodeling a home; transferring rescued construction materials to new structures or applications can give a place a built-in sense of history. Eco-conscious renovators can also purchase new lumber that has been certified by the Forest Stewardship Council (FSC), which ensures that the wood has been harvested in an environmentally responsible manner.
Cleaning laminate wood flooring has everything to do with knowing what not to do to it.
Photo: istockphoto.com
Laminate is generally simple to maintain, but it’s important to know what not to do. Avoid all detergent-based cleaners, which leave a dull film behind when they dry. Likewise, waxes and abrasives can build up residue and compromise the smoothness of the surface. Instead, in tandem with regular sweeping and vacuuming, use a store-bought laminate cleaner. Position mats at exterior entrances to catch incoming dirt and always clean up spills quickly to help extend your laminate’s lifespan.
Hardwood floors require regular cleaning that’s specific to your floor’s finish.
Photo: istockphoto.com
Keeping hardwood floors from aging faster than the rest of the house requires a little TLC, including regular sweeping and using both an all-purpose, no-wax wood cleaner and a restoring agent that’s appropriate for the floor’s finish. A wax finish can be revived with additional wax, for example, but it’s not a good idea to use wax on varnished or polyurethane-finished wood. Before using any restoring agent, make sure it’s made specifically for your type of flooring.
Given how sensitive hardwood flooring is to sunlight, scratches, dirt, and debris, it’s wise to take measures beyond a regular wipe down to care for it. Start by setting out mats and runners near exterior doors to keep dirt and moisture from being tracked onto the floor. Apply protective pads to furniture legs, keep pets’ claws trimmed, and avoid wearing high heels to prevent denting and scratching.
A good measure of high-quality laminate flooring is the floor’s abrasion class rating and the thickness of its core.
When shopping for high-quality laminate flooring, it’s crucial to understand that not all laminate flooring is equally good at resisting marks and scratches. Laminate flooring comes with abrasion ratings that determine just how much abuse the surface can take. Ratings range from abrasion class AC1 to AC5. AC1 is the most susceptible to wear, so it is suitable for low-traffic areas in the home, whereas AC3 is a good choice for high-traffic areas, such as kitchens and entryways. AC5 laminate flooring, which has the maximum scratch and dent resistance, is reserved for commercial use.
Thickness is also another important consideration when shopping for laminate flooring. A good-quality laminate flooring will range in thickness from 7 millimeters (mm) to 12 mm. While thicker flooring will have better soundproofing qualities, thickness does not impact durability. Refer to a laminate flooring’s AC rating as you weigh its durability.
Hardwood is not water-resistant wood flooring—laminate is better for damp locations.
While hardwood flooring may be more durable than laminate flooring, there are certain high-traffic areas in the house in which laminate flooring performs better. Water from spills, showers, and leaky appliances can easily damage hardwood flooring. While laminate is not impervious to water damage, it does a much better job of holding up against moisture because it has a water-resistant layer and underlayment. For this reason, laminate flooring is a much better choice for kitchens and bathrooms than hardwood flooring.
When it comes to valuing a home, installing hardwood flooring is a better return on investment than installing laminate.
Photo: istockphoto.com
Real hardwood flooring will always trump laminate flooring when it comes to adding value to a home. As long as the flooring is in good condition, you can expect a 70 percent to 80 percent return on your investment when selling the home. While laminate flooring will increase the value of the home over traditional carpeting or linoleum, it won’t match the high rate of return you can expect from a real hardwood floor.
Final Thoughts
Deciding between laminate vs. hardwood largely comes down to preference and budget. Hardwood flooring has the look and feel of real wood that laminate can mimic but can’t match, so hardwood is a good choice for purists who don’t mind paying extra for it. And, while hardwood can wear more quickly than laminate, it is possible to refinish it at a much lower cost than replacement, whereas laminate must be replaced once it is worn out.
Laminate, in comparison, better resists scratches, dents, and water damage and is much more affordable from the start. And, high-end laminate features embossed technology that very closely imitates the look of real wood. These qualities make laminate a great choice for high-traffic areas, and for homeowners who want to add the look of hardwood flooring on a budget.
by Lauren Busser, Direct from the Designers™’ Editorial Director
Choosing a floor plan for your new home is an exciting process. As you start combing through your different options, it is important to know how your family will use the space and how it will fit with your lifestyle. The right floor plan will greatly improve how you experience your new home, and everything from its shape to its style should be accounted for. You might be overwhelmed by your options, but we’re here to help. Here are some tips to help you better decide which house plan is perfect for you.
Size
Your first consideration when you are selecting a house plan should be size. You don’t want to run the risk of over- or under-building your home. As you begin browsing plans for your home, take a moment and make a wish list of things that your new home should have. Ask yourself how many bedrooms you want, whether or not you need a formal dining room, and what style kitchen would suit you. These details will help guide you on your path to finding a new home.
Design Style
Every homeowner has their own design style and choosing a floor plan that meets those needs is essential. If you are more traditional and you want wall space to hang art or photos, you might want a more compartmentalized, traditional floor plan where walls separate each space. If you want something more modern with a contemporary, open feel, then consider an open floor plan.
One of the basic ways to help decide this is to take a moment and look at the furniture and other objects in your home. If your furniture tends to coordinate, an open floor plan could work for you. If you love your furniture but it covers a wide range of styles, then a traditional floor plan might be a better option.
Trust Your Instincts
When looking at or touring different floor plans, you should pay attention to what just feels right. You will be surprised as to how many different layouts there are when it comes to house plans. Don’t be afraid to look at something different, but remember your gut reactions when you are making your final decision.
Consider Cost of Materials and Furniture
Investing in new furniture is a major expense, and the same is true for things like flooring and paint. While building a home means you will definitely need to account for your new walls and floors, you can save yourself piles of cash if you’re able to use your existing furniture. If you decide to keep and use most of your furniture, consider where the pieces will go in your new home and measure to make sure it will fit in your new space.
Be Mindful of Your Budget
While you are making your design decisions, be mindful of the costs associated with the layout. Consider the costs of heating and cooling your home as well as general maintenance and operating costs. Ask a contractor or a builder to help you determine the costs of your favorite floor plans and help you narrow your choices to the types that best fit your budget.
Consider Modifications
So you found a house plan that you absolutely love, but something isn’t quite right about it. Whether you want to add a room, increase or decrease your ceiling heights, or your changes are more elaborate, your architect will guide you through the entire process.
Choosing a floor plan for your new home is a complex decision, but with time and research you will find the perfect floor plan for your dream home. So grab a pen and paper and start making your wish list.